NAT traversal

In a typical IPSec setup tunnels are established between equipment having public IPs. But what happen if one or both gateway are behind firewalls doing NAT ? As you can imagine this setup simply can’t work. There is two reasons for that.

First IKE exchange can’t be successful because of how NAT translations work. The embedded address of the source computer within the IP payload can’t match the source address of the IKE packet as it is replaced by the address of the NAT device.

Secondly ESP traffic can’t be NATed because there is no port in ESP. Therefore when a client attempts to initiate an ESP connection behind a network device doing NAT, the device is unable to maintain a unique translation state with these packets.

NAT-Traversal to the rescue !

To bypass these limitations, NAT-T was created. The idea is simply to a friendly NAT protocol (UDP) to encapsulate ESP exchange. During phase 1, if NAT-T is used, IKE negotiations switch to UDP port 4500.

After the tunnel is establish, instead of sending plain ESP packets, each one is encapsuled in an UDP packets. This trick allow the device doing NAT to maintain the connection state in its table.

Further Reading and sources

NSE scripts

The most powerful feature of nmap is its script engine. This allow you to use it in a semi-automatic mode, performing complex task, such as vulnerability detection, backdoor detection and even vulnerability exploitation.

You can find a list of NSE scripts here, and write your own in LUA.

Currently my two favorite are :

TCP/IP tuning for scalability

Increase max files limits

Sockets *are* files, so in order to improve TCP scalability the first step is to verify you have enough file descriptors available. You can check the current values with the ulimit -a command. If needed increase them.

Increase port range

By default ports between 32768 and 61000 are kept for ‘ephemeral’ usage. That plenty for clients, but could be too tight for busy web servers.

You can increase the port range like this:

# sysctl -w net.ipv4.ip_local_port_range="12800 65535"

Don’t forget to add your setting inside the /etc/sysctl.conf file.

Enable TCP reuse

The TCP_TW_REUSE flag allow the kernel to reuse TCP connection in TIME_WAIT state for a new outgoing connection if the new timestamp is strictly bigger than the most recent timestamp recorded for the previous connection.

This optimization is pretty great for web server that deal with many short TCP connections. You can enable it like this:

# sysctl -w net.ipv4.tcp_tw_reuse=1

Don’t forget to add your setting inside the /etc/sysctl.conf file.

There is also another parameter, called net.ipv4.tcp_tw_recycle. Do NOT enable it !

Fast-recycling of every TIME-WAIT sockets sound like a good idea but this option will cause problems with NAT clients. For more information on the subject, check this excellent article.

lsof – a more powerful command than you think

lsof is a command used to find out which files are open by which process. But as the Unix way of life is that everything is a file, lsof can be use for a lot more then that:

List processes which opened a specific file

# lsof /var/log/syslog
COMMAND    PID USER   FD   TYPE DEVICE SIZE/OFF     NODE NAME
rsyslogd 13315 root    7w   REG   0,36   246213 15074839 /var/log/syslog

List opened files under a directory

# lsof +D /var/log/
COMMAND    PID          USER   FD   TYPE DEVICE SIZE/OFF     NODE NAME
php5-fpm  1968          root    2w   REG   0,36      434 15074914 /var/log/php5-fpm.log
php5-fpm  1968          root    5w   REG   0,36      434 15074914 /var/log/php5-fpm.log
apache2   7466          root    2w   REG   0,36      279 15076913 /var/log/apache2/error.log
...

List all open files by a specific process

# lsof -p 1968
COMMAND   PID USER   FD   TYPE             DEVICE SIZE/OFF      NODE NAME
php5-fpm 1968 root  cwd    DIR               0,36     4096  15073281 /
php5-fpm 1968 root  rtd    DIR               0,36     4096  15073281 /
php5-fpm 1968 root  txt    REG               0,36  9110296  15081382 /usr/sbin/php5-fpm
php5-fpm 1968 root  mem    REG              253,0           15081382 /usr/sbin/php5-fpm (path dev=0,36)
...

List opened files based on process names

# lsof -c ssh
COMMAND   PID USER   FD   TYPE             DEVICE SIZE/OFF       NODE NAME
sshd     8463 root  cwd    DIR               0,36     4096   15073281 /
sshd     8463 root  rtd    DIR               0,36     4096   15073281 /
sshd     8463 root  txt    REG               0,36   787080   15076801 /usr/sbin/sshd
sshd     8463 root  mem    REG              253,0            15077206 /lib/x86_64-linux-gnu/libnss_files-2.19.so (path dev=0,36)
...

You can use the -c parameter, multiple time.

Show network connections

# lsof -i
COMMAND     PID  USER   FD   TYPE  DEVICE SIZE/OFF NODE NAME
ssh         636 daber    3u  IPv4 1381573      0t0  TCP 10.10.32.54:54188->b1.vpn.ti.smile.fr:ssh (ESTABLISHED)
ssh         834 daber    3u  IPv4 1385285      0t0  TCP 10.10.32.54:60902->b3.vpn.ti.smile.fr:ssh (ESTABLISHED)
ssh         892 daber    3u  IPv4 1386338      0t0  TCP 10.10.32.54:39496->b2.vpn.ti.smile.fr:ssh (ESTABLISHED)
chromium   1476 daber   87u  IPv4 1429223      0t0  TCP zapan.dhcp.mpl.intranet:49404->par10s09-in-f35.1e100.net:https (ESTABLISHED)
...

You can also add additional parameters to filter on the port number. For example to only show SSH connections: lsof -i TCP:22
You can also specify a range: lsof -i TCP:1-1024

Show all files opened by a specific user

# lsof -u daber
COMMAND     PID  USER   FD      TYPE             DEVICE  SIZE/OFF       NODE NAME
ssh         636 daber  cwd       DIR               0,35     28672   13238276 /home/daber
ssh         636 daber  rtd       DIR                8,1      4096          2 /
ssh         636 daber  txt       REG                8,1    666088     659561 /usr/bin/ssh
ssh         636 daber  mem       REG                8,1     22952     524315 /lib/x86_64-linux-gnu/libnss_dns-2.19.so
...

Note that you can use ^ to inverse the command (exclude only a particular user).

Kill all process of particular user

# kill `lsof -t -u daber`

hping2

hping2 is a network tool able to send custom TCP/UDP/ICMP packets and display target replies. It work pretty much like ping but with far more options. It can be used among other things to:

  • test firewall rules
  • make port scanning
  • test net performance using different protocols, packet size, etc…
  • Path MTU discovery
  • traceroute like under different protocols

Testing port state

One of the most useful use-case of hping is to test if a TCP port is open or not:

# hping -S -p 22 192.70.106.78
HPING 192.70.106.78 (eth0 192.70.106.78): S set, 40 headers + 0 data bytes
len=40 ip=192.70.106.78 ttl=64 DF id=0 sport=22 flags=RA seq=0 win=0 rtt=0.2 ms

The RA flag indicate that the TCP port 22 is closed. The remote host have sent a RST/ACK in response to our SYN packet. If the port was open the flag would have been SA instead.

Not that you can also use the ++ parameter to automatically increase the port number:

# hping -S -p ++80 192.168.10.1

Port scanning

hping can be use as a lightweight port scanner:

# hping -S --scan 20-22,80,8080 -V 192.168.100.1
using eth0, addr: 192.168.100.18, MTU: 1500
Scanning 192.168.100.1 (192.168.100.1), port 20,21,22,80,8080
5 ports to scan, use -V to see all the replies
+----+-----------+---------+---+-----+-----+
|port| serv name |  flags  |ttl| id  | win |
+----+-----------+---------+---+-----+-----+
   20 ftp-data   : ..R.A...  64     0     0
   21 ftp        : ..R.A...  64     0     0
   22 ssh        : .S..A...  64     0  5840
   80 www        : .S..A...  64     0  5840
 8080 http-alt   : .S..A...  64     0  5840
All replies received. Done.
Not responding ports:

Firewall mapping

traceroute is usually the first utility people use for this task but it’s limited to UDP “probe” packets (on port 53 by default). hping can use any protocol:

# hping -z -t 6 -S mail.test.com -p 143
TTL 0 during transit from ip=10.1.5.3
7: TTL 0 during transit from ip=10.1.5.3
8: TTL 0 during transit from ip=10.2.5.3
9: TTL 0 during transit from ip=10.3.5.3
10: TTL 0 during transit from ip=10.4.5.3
11: TTL 0 during transit from ip=10.6.5.3
....
len=46 ip=10.5.5.3 flags=SA DF seq=33 ttl=47 id=0 win=5840 rtt=4341.3ms

Doing a SYN attack

hping can forge packets with a spoofed IP address using the -a parameter. Together with the -i (for interval) option, you can use it to make a SYN attack :

# hping -a 192.168.10.99 -S 192.168.10.33 -p 80 -i u1000

Transferring file

hping can be use in very creative manners, for example to transfer a file between two hosts you have access to, through a very ‘closed’ firewall.

On the receiving end we need to start hping in listener mode, and specify a ‘signature’ string that indicate the beginning of the file content:

# hping 192.168.10.66 --listen signature --safe --icmp > myfile

On the sending side, you must ‘sign’ the packet, with the signature used at the receiving site, and indicate the file to read:

# hping 192.168.10.44 --icmp -d  100 --sign signature
--file myfile

ICMP, TCP or UDP can be use indiscriminately.

Further Reading and sources

[DRBD] Fixing a split-brain

For the most part DRBD is pretty resilient but if a power failure occurs on both nodes or if you screw up an update on a Corosync cluster, you have a good chance to finish with a split-brain situation. In that case DRBD automatically disconnect the resources and let you must fix the mess by hand.

Check nodes status

cat /proc/drbd
version: 8.4.0 (api:1/proto:86-100)
GIT-hash: 28753f559ab51b549d16bcf487fe625d5919c49c build by gardner@, 2011-12-1
2 23:52:00
 0: cs:StandAlone ro:Secondary/Unknown ds:UpToDate/DUnknown   r-----
    ns:0 nr:0 dw:0 dr:0 al:0 bm:0 lo:0 pe:0 ua:0 ap:0 ep:1 wo:b oos:76

The master isn’t happy and running.
The secondary node isn’t better either:

cat /proc/drbd
version: 8.4.0 (api:1/proto:86-100)
GIT-hash: 28753f559ab51b549d16bcf487fe625d5919c49c build by gardner@, 2011-12-1
2 23:52:00
 0: cs:StandAlone ro:Primary/Unknown ds:UpToDate/DUnknown   r-----
    ns:0 nr:0 dw:144 dr:4205 al:5 bm:0 lo:0 pe:0 ua:0 ap:0 ep:1 wo:b oos:100

Fixing the cluster

To repair the cluster we will declare one node “obsolete” (we choose the secondary here) and then reconnect resources so they can resume synchronization.

On the “obsolete” node:

drbdadm secondary all
drbdadm disconnect all
drbdadm -- --discard-my-data connect all

On the master node:

drbdadm primary all
drbdadm disconnect all
drbdadm connect all

iptstate

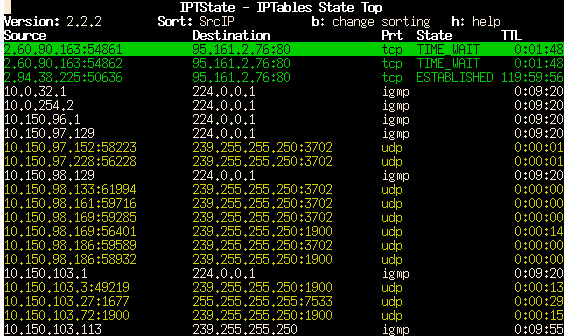
iptstate is a ncurse tool that displays information held in the netfilter conntrack table in a top-like format. Output can be sorted by any field, reversed, and has several formatting option:

[OpenBSD] DDoS survival guide

First keep calm and check your firewall/router state table:

fw1:~# pfctl -si | grep current
current entries                    421356 

Here we have a state table with much more entries than usual (400K instead of 100K). There is very probably an ongoing attack.

Which IP is targeted ?

For this task i use this script:

fw1:~# fw1:~# pfctl -ss | top_states.pl
62.210.216.82 (387654)
62.210.119.54 (1544)
62.210.216.10 (900)
62.210.216.13 (864)
...

The targeted IP will have an abnormally large number of entries. Here the winner is 62.210.216.82

On which port ?

fw1~# pfctl -ss | grep -- "-> 62.210.216.82" | awk '{print $5}' | sort -n | uniq -c
200307 62.210.216.82:80

Classic HTTP Flood attack.

At this point we have two possibilities:

  • limits the number of simultaneous connections to the targeted IP
  • block any access to the targeted IP

The first solution is appropriate in case of small scale attack. The latter is more extreme but has the advantage to not put at risk the rest of the network.

Limit the number of simultaneous connections

Add the following rule before the one authorizing the port 80:

pass in quick on $ext_if proto tcp to 62.210.216.82 port http keep state (max 10000)

Then kill all the supernumerary state entries:

fw1:~# pfctl -k 0.0.0.0/0 -k 62.210.216.82
fw1:~# pfctl -k 62.210.216.82

Block any access

Add the following rule:

block in quick on $ext_if to 62.210.216.82

Then kill all the supernumerary state entries:

fw1:~# pfctl -k 0.0.0.0/0 -k 62.210.216.82
fw1:~# pfctl -k 62.210.216.82

ethstatus

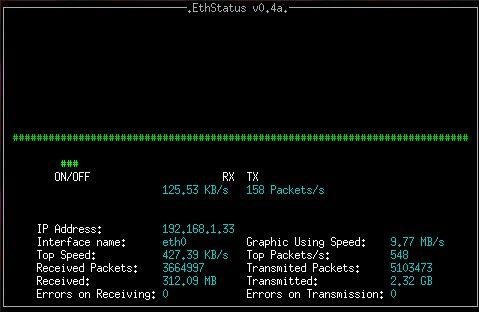
ethstatus is a simple ncurse program for displaying real time statistics of incoming and outgoing traffic. It is similar to iptraf but is meant to run as a permanent console task to monitor the network load.

ethstatus can take several options, like -i to specify the ethernet interface to monitor and -S to specify the maximum network speed in bits per second.

nmap

nmap aka. network mapper is a very versatile network tool. It can be use to explore networks, perform quick ‘security’ audit and find open ports on remote machines.

Scan an IP

# nmap 192.168.0.4

Scan a range

# nmap 192.168.0.4-22

Scan a subnet

# nmap 192.168.0.0/24

Beside providing a netmask you can also use a wildcard character:

# nmap 192.168.0.*

Exclude an IP from a scan

Use the --exclude option. You can specify an IP or a range.

Scan a list of hosts from a file

Use the -iL option. nmap will use the file content as a list of host to scan.

Find out ‘live’ hosts in a network

Use the -sP option. Only the responsive hosts will be listed:

# nmap -sP 10.4.0.0/24

Guess the host OS

Use the -O --osscan-guess options. nmap will try to determine the OS of the scanned hosts using several tricks.

Perform a tcp null scan to “fool” a firewall

# nmap -sN 192.168.0.4