The package yum-utils provide a useful tool called package-cleanup. You can use it to remove ‘unused’ packages like this:
# package-cleanup --leavesand orphan packages like this:
# package-cleanup --orphansThe package yum-utils provide a useful tool called package-cleanup. You can use it to remove ‘unused’ packages like this:
# package-cleanup --leavesand orphan packages like this:
# package-cleanup --orphansOne amusing fact about filesystem is that the logical structure we see is very different from the “real” on-disk structure. For example we are used to thinking about directories as files “containers”, but in reality directories are just a type of file themselves and don’t store any files data.
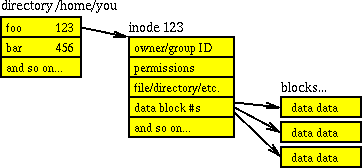
On a modern filesystem (which means pretty much every filesystem nowadays with the exception of the old-but-still-in-use FAT32) files are split into two different parts: data blocks and inodes. Data blocks contain chuck of the file “contents”. Depending of the file size one or a huge number of data block are used. Inodes contains information about the file itself like its attributes (permission, owner id, group id, size, number of hard links, etc… depending the filesystem features) and the data blocks location. Directories are a ‘special’ type of file, containing a lists of association structures (aka. files) each of which contains one filename and one inode number.
Basically that look like this:

Now one important information to know is that most filesystems doesn’t allocate physical space to create inodes on the fly, but rather use space reserved for this task. So there is a maximum number of inodes for a given partition. When all inodes are ‘consumed’ no new file can be created.
Checking inodes usage
Therefore when troubleshooting you should not only check the remaining disk space, but also the remaining number of inodes:
# df -ihAnd if you want to find which directories in the current path ‘use’ the most inodes:
# find . -xdev -type f | cut -d "/" -f 2 | sort | uniq -c | sort -nOther commands with inodes options
ls can display inodes number with the -i option.
rm can delete a file indicated by its inode number with the same -i option. This combo really help when dealing with file with ‘strange’ or corrupted filename.
find has a -inum option. For example for finding file(s) knowing only its inode number:
find . -inum 435304 -printFor deleting this or theses files (remember hardlink have the same inode number):
find . -inum 435304 -deleteThe tree command also has a cool --inodes option.
dd can be use in a lot of creative ways, but before playing with it remember to:
if= and of= valuesHere some examples of fun things you can do with dd:
Backup an entire partition
# dd if=/dev/sda1 of=~/disk.imgFor a compressed version:
# dd if=/dev/sda1 | gzip > ~/disk.img.gzOn a remote machine:
# dd if=/dev/sda1 | ssh foobar@192.168.0.2 "sudo dd of=/home/foobar/disk.img"Restore an image partition
# dd if=disk.img of=/dev/sda1For a compressed version:
# dd if=disk.img.gz | gunzip | dd of=/dev/sda1Rip a CDROM
# dd if=/dev/cdrom of=disk.iso bs=2048Clone hard disks
# dd if=/dev/sda of=/dev/sdb bs=4096 iflag=noerror oflag=syncErase MBR content
# dd if=/dev/zero of=/dev/sda bs=512 count=1Further Reading and sources
What is a DNS zone ?
A zone is a subset, often a single domain, of the hierarchical DNS. Zone are generally defined inside a single ‘zone’ file, that describe its properties (refresh time, domain expiry, default TTL value, etc…) and all its resource records.
Create a new zone file
Let create a new zone file for brand new domain foobar.com. Following the BIND naming convention the zone file will be /etc/bind/db.foobar.com.conf, and look pretty much like this:
; Zone file for foobar.com
$TTL    3600
$ORIGIN foobar.com
@       IN      SOA     ns1.mydns.com.    root.foobar.com. (
                     2012033101         ; Serial
                           3600         ; Refresh
                           1800         ; Retry
                         604800         ; Expire
                          43200 )       ; Negative Cache TTL

        IN      NS      ns1.mydns.com.
        IN      NS      ns2.mydns.com.

@       IN      A       192.168.0.2
www     IN      A       192.168.0.2
The NS records indicate that we use two DNS servers for this new zone : ns1.mydns.com and ns2.mydns.com. The SOA record specify that ns1.mydns.com is the start of authority, and give the domain properties. Then we have a couple of classic A records, for the domain and a subdomain. Note here the usage of the @ symbol which is a shorthand for the $ORIGIN value.
Add the new zone
Now that we have a new zone file, we must modify BIND main setting file, usually /etc/bind/named.conf.local
For the master of the new zone, ns1.mydns.com here, we add the following block:
zone "foobar.com" {
        type master;
        file "/etc/bind/db.foobar.com.conf";
};
For slaves, like ns2.mydns.com, the syntax is a little different:
zone "foobar.com" {
        type slave;
        file "/etc/bind/db.foobar.com.conf";
        masters { ; };
};
Reload BIND configuration
# rndc reloadWipe entire hard drives
The primary usage of the shred command is to wipe entire partition by overwriting the content. For example, to wipe /dev/sda5:
shred -vfz -n 10 /dev/sda5-v: show progress
-f: change permissions to allow writing if necessary
-z: add a final overwrite with zeros to hide shredding
-n: overwrite N times instead of the default three time
Here we will overwrite /dev/sda5 ten times, enough to ensure that data can’t be retrieve without very special and complicated method.
Shred individual files
shred can also be use to overwrite and delete a given file, but it maybe not so efficient in that case. The man page warm you about:
CAUTION: Note that shred relies on a very important assumption: that the file system overwrites data in place. This is the traditional way to do things, but many modern file system designs do not satisfy this assumption.It’s hard to evaluate if recovery of a “shredded” file could be possible, as it depend on the filesystem (and the mount options for ext3/4) and how data is ordered on the device. But keep this limitations in mind. For the command simply do:
shred -u foobar.txtBy default shred overwrites the file 25 times. You can customize this value using the --iterations=n parameter.