Initialize an encrypted external HDD or USB key

Prerequisites

  • an external hdd or usb key already partitioned
  • cryptsetup

Initializing

First format the partition:

cryptsetup luksFormat /dev/<partition>

Now we have a fresh new luks volume. Let’s open it:

cryptsetup luksOpen /dev/<partition> <my_alias>

The volume should be available under /dev/mapper/<my_alias>

Create a filesystem inside the volume:

mkfs.ext4 /dev/mapper/<my_alias>

Perfect. Now close the lurks volume:

cryptsetup luksClose <my_alias>

Initialization is done. Next time you will connect your device your file manager should prompt a pop-up asking the passphrase of your key.

Further Reading and sources

[DRBD] Fixing a split-brain

For the most part DRBD is pretty resilient but if a power failure occurs on both nodes or if you screw up an update on a Corosync cluster, you have a good chance to finish with a split-brain situation. In that case DRBD automatically disconnect the resources and let you must fix the mess by hand.

Check nodes status

cat /proc/drbd
version: 8.4.0 (api:1/proto:86-100)
GIT-hash: 28753f559ab51b549d16bcf487fe625d5919c49c build by gardner@, 2011-12-1
2 23:52:00
 0: cs:StandAlone ro:Secondary/Unknown ds:UpToDate/DUnknown   r-----
    ns:0 nr:0 dw:0 dr:0 al:0 bm:0 lo:0 pe:0 ua:0 ap:0 ep:1 wo:b oos:76

The master isn’t happy and running.
The secondary node isn’t better either:

cat /proc/drbd
version: 8.4.0 (api:1/proto:86-100)
GIT-hash: 28753f559ab51b549d16bcf487fe625d5919c49c build by gardner@, 2011-12-1
2 23:52:00
 0: cs:StandAlone ro:Primary/Unknown ds:UpToDate/DUnknown   r-----
    ns:0 nr:0 dw:144 dr:4205 al:5 bm:0 lo:0 pe:0 ua:0 ap:0 ep:1 wo:b oos:100

Fixing the cluster

To repair the cluster we will declare one node “obsolete” (we choose the secondary here) and then reconnect resources so they can resume synchronization.

On the “obsolete” node:

drbdadm secondary all
drbdadm disconnect all
drbdadm -- --discard-my-data connect all

On the master node:

drbdadm primary all
drbdadm disconnect all
drbdadm connect all

Useful commands to check hard disk partitions

fdisk

fdisk is a general partitioning tool, and was the de-facto standard at the time all hard drive were under 2TB. It’s still a useful tool today. You can use it to display partitions information like this:

$ sudo fdisk -l

Disk /dev/sda: 298.1 GiB, 320072933376 bytes, 625142448 sectors
Units: sectors of 1 * 512 = 512 bytes
Sector size (logical/physical): 512 bytes / 512 bytes
I/O size (minimum/optimal): 512 bytes / 512 bytes
Disklabel type: dos
Disk identifier: 0x000ae2b8

Device     Boot    Start       End   Sectors   Size Id Type
/dev/sda1  *        2048  60000255  59998208  28.6G 83 Linux
/dev/sda3       60000256 625141759 565141504 269.5G  5 Extended
/dev/sda5       60002304  75001855  14999552   7.2G 82 Linux swap / Solaris
/dev/sda6       75003904 625141759 550137856 262.3G 83 Linux

As you can see each partition is reported separately with details about size, start and end sectors id, type, etc…

parted

With disk > 2TB a new type type of partitioning table was needed to replace the old MBR. That the GPT (GUID Partitioning Table). New partitioning tool were needed too, hence the creation of parted. Like fdisk you can use parted to display partitions information:

$ sudo parted -l

Model: ATA Hitachi HTS72323 (scsi)
Disk /dev/sda: 320GB
Sector size (logical/physical): 512B/512B
Partition Table: msdos
Disk Flags: 

Number  Start   End     Size    Type      File system     Flags
 1      1049kB  30.7GB  30.7GB  primary   ext4            boot
 3      30.7GB  320GB   289GB   extended
 5      30.7GB  38.4GB  7680MB  logical   linux-swap(v1)
 6      38.4GB  320GB   282GB   logical   ext4

df

df displays the amount of disk space available on all currently mounted file systems.

$ df -h
Filesystem            Size  Used Avail Use% Mounted on
/dev/sda1              29G  5.3G   22G  20% /
udev                   10M     0   10M   0% /dev
tmpfs                 1.2G   31M  1.2G   3% /run
tmpfs                 2.9G   54M  2.9G   2% /dev/shm
tmpfs                 5.0M  4.0K  5.0M   1% /run/lock
tmpfs                 2.9G     0  2.9G   0% /sys/fs/cgroup
/dev/sda6             259G  207G   39G  85% /home
tmpfs                 587M   16K  587M   1% /run/user/10991
/home/daber/.Private  259G  207G   39G  85% /home/daber

Note that df can take additional arguments to customize it output:

$ df -h --output=source,fstype,size,used,avail,pcent,target -x tmpfs -x devtmpfs
Filesystem           Type      Size  Used Avail Use% Mounted on
/dev/sda1            ext4       29G  5.3G   22G  20% /
/dev/sda6            ext4      259G  207G   39G  85% /home
/home/daber/.Private ecryptfs  259G  207G   39G  85% /home/daber

di

di is kind of like a more advanced version of df:

$ di
Filesystem         Mount               Size     Used    Avail %Used  fs Type 
/dev/sda1          /                  28.0G     5.2G    21.4G   24%  ext4    
tmpfs              /dev/shm            2.9G     0.1G     2.8G    2%  tmpfs   
tmpfs              /etc/machine-id     1.1G     0.0G     1.1G    3%  tmpfs   
/dev/sda6          /home             258.1G   206.1G    38.8G   85%  ext4    
/home/daber/.Priva /home/daber       258.1G   206.1G    38.8G   85%  ecryptfs
tmpfs              /run                1.1G     0.0G     1.1G    3%  tmpfs   
tmpfs              /run/lock           5.0M     0.0M     5.0M    0%  tmpfs   
tmpfs              /run/user/10991   586.3M     0.0M   586.3M    0%  tmpfs   
tmpfs              /sys/fs/cgroup      2.9G     0.0G     2.9G    0%  tmpfs   

di has many formatting options, which is very interesting for scripting.

lsblk

lsblk lists information about all available block devices. It doesn’t report the used/free disk space on partitions, but indicate their type and mountpoint:

$ sudo lsblk

NAME   MAJ:MIN RM   SIZE RO TYPE MOUNTPOINT
sda      8:0    0 298.1G  0 disk 
├─sda1   8:1    0  28.6G  0 part /
├─sda3   8:3    0     1K  0 part 
├─sda5   8:5    0   7.2G  0 part [SWAP]
└─sda6   8:6    0 262.3G  0 part /home
sr0     11:0    1  1024M  0 rom  

blkid

blkid prints the block device attributes. I usually use it for finding uuid for a given partition:

$ sudo blkid
/dev/sda5: UUID="38103cc4-6954-452a-a85d-841a0c9cb427" TYPE="swap" PARTUUID="000ae2b8-05"
/dev/sda1: UUID="f03c5ff1-e48f-4132-a955-de504284550f" TYPE="ext4" PARTUUID="000ae2b8-01"
/dev/sda6: UUID="de9f9a5d-8217-4378-8e51-90e2af77e3bc" TYPE="ext4" PARTUUID="000ae2b8-06"

Erase partition content with dd

If you don’t want or can’t use shred, it’s possible to use dd to erase the content of a partition.

Quick and unsafe method

The first method is to write 0 on all sectors of the disk in a single pass:

# dd if=/dev/zero of=/dev/sdX bs=512 conv=notrunc

Slow and moderately safe method

The second method, a bit more secure than the previous one, is to fill sector with data from the kernel pseudorandom number generator:

# dd if=/dev/urandom of=/dev/sdX bs=512 conv=notrunc

Slow and safe method

Pretty much the same method then the previous one, but this time we will make multiple pass (here 8) :

# for n in `seq 8`; do dd if=/dev/urandom of=/dev/sdX bs=512 conv=notrunc; done

Bad magic number in super-block

Sometime things goes wrong and filesystem finish in a corrupted state.
That were tools like fsck come to the rescue:

fsck /dev/sda5
fsck 1.41.4 (27-Jan-2009)
e2fsck 1.41.4 (27-Jan-2009)
fsck.ext4: Group descriptors look bad... trying backup blocks...
fsck.ext4: Bad magic number in super-block while trying to open /dev/sda5
 
The superblock could not be read or does not describe a correct ext4
filesystem.  If the device is valid and it really contains an ext4
filesystem (and not swap or ufs or something else), then the superblock
is corrupt, and you might try running e2fsck with an alternate superblock:
e2fsck -b 8193 <device>

Oups. The error “Bad magic number in super-block” clearly indicate that the superblock of the partition /dev/sda5 is in bad shape. But you can use superblock backup to restore the filesystem in a functional state.

First lets find where your superblock backups are kept:

mke2fs -n /dev/xxx
...
Superblock backups stored on blocks:
32768, 98304, 163840, 229376, 294912, 819200, 884736, 1605632, 2654208

Then restore the superblock from one of its backup:

e2fsck -b 2654208 /dev/sda5

A little fun with inodes

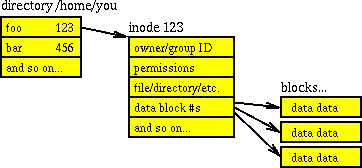
One amusing fact about filesystem is that the logical structure we see is very different from the “real” on-disk structure. For example we are used to thinking about directories as files “containers”, but in reality directories are just a type of file themselves and don’t store any files data.

On a modern filesystem (which means pretty much every filesystem nowadays with the exception of the old-but-still-in-use FAT32) files are split into two different parts: data blocks and inodes. Data blocks contain chuck of the file “contents”. Depending of the file size one or a huge number of data block are used. Inodes contains information about the file itself like its attributes (permission, owner id, group id, size, number of hard links, etc… depending the filesystem features) and the data blocks location. Directories are a ‘special’ type of file, containing a lists of association structures (aka. files) each of which contains one filename and one inode number.

Basically that look like this:

Now one important information to know is that most filesystems doesn’t allocate physical space to create inodes on the fly, but rather use space reserved for this task. So there is a maximum number of inodes for a given partition. When all inodes are ‘consumed’ no new file can be created.

Checking inodes usage

Therefore when troubleshooting you should not only check the remaining disk space, but also the remaining number of inodes:

# df -ih

And if you want to find which directories in the current path ‘use’ the most inodes:

# find . -xdev -type f | cut -d "/" -f 2 | sort | uniq -c | sort -n

Other commands with inodes options

ls can display inodes number with the -i option.
rm can delete a file indicated by its inode number with the same -i option. This combo really help when dealing with file with ‘strange’ or corrupted filename.

find has a -inum option. For example for finding file(s) knowing only its inode number:

find . -inum 435304 -print

For deleting this or theses files (remember hardlink have the same inode number):

find . -inum 435304 -delete

The tree command also has a cool --inodes option.

A little fun with dd

dd can be use in a lot of creative ways, but before playing with it remember to:

  • always triple check if= and of= values
  • never ever write on a mounted filesystem

Here some examples of fun things you can do with dd:

Backup an entire partition

# dd if=/dev/sda1 of=~/disk.img

For a compressed version:

# dd if=/dev/sda1 | gzip > ~/disk.img.gz

On a remote machine:

# dd if=/dev/sda1 | ssh foobar@192.168.0.2 "sudo dd of=/home/foobar/disk.img"

Restore an image partition

# dd if=disk.img of=/dev/sda1

For a compressed version:

# dd if=disk.img.gz | gunzip | dd of=/dev/sda1

Rip a CDROM

# dd if=/dev/cdrom of=disk.iso bs=2048

Clone hard disks

# dd if=/dev/sda of=/dev/sdb bs=4096 iflag=noerror oflag=sync

Erase MBR content

# dd if=/dev/zero of=/dev/sda bs=512 count=1

Further Reading and sources

Shred

Wipe entire hard drives

The primary usage of the shred command is to wipe entire partition by overwriting the content. For example, to wipe /dev/sda5:

shred -vfz -n 10 /dev/sda5

-v: show progress
-f: change permissions to allow writing if necessary
-z: add a final overwrite with zeros to hide shredding
-n: overwrite N times instead of the default three time

Here we will overwrite /dev/sda5 ten times, enough to ensure that data can’t be retrieve without very special and complicated method.

Shred individual files

shred can also be use to overwrite and delete a given file, but it maybe not so efficient in that case. The man page warm you about:

CAUTION: Note that shred relies on a very important assumption: that the file system overwrites data in place. This is the traditional way to do things, but many modern file system designs do not satisfy this assumption.

It’s hard to evaluate if recovery of a “shredded” file could be possible, as it depend on the filesystem (and the mount options for ext3/4) and how data is ordered on the device. But keep this limitations in mind. For the command simply do:

shred -u foobar.txt

By default shred overwrites the file 25 times. You can customize this value using the --iterations=n parameter.

Make a file immutable

Native linux partition format (like ext2/3/4) have a pretty cool functionality: file attribute. Theses attributes give you some control on how the kernel treat a particular file. The command chattr and lsattr allow you to change and check theses attributes.

One attribute that can be a life saver for system administrator is the ‘immutable’ one. When flagged ‘immutable’ no one, not even root, can change a file. This allow you to prevent any accidental modification. For example let say we want to prevent any change on the /etc/shadow file:

# chattr +i /etc/shadow

When modification are required, we simply remove the flag:

# chattr -i /etc/shadow

There is a lot of other attributes to play with. Check chattr man page for more detail on them.

GParted Live

I’m pretty sure you already know gparted. Now you can have the power and simplicity of GParted on a biz-card size LiveCD ! Check here.