[DRBD] Fixing a split-brain

For the most part DRBD is pretty resilient but if a power failure occurs on both nodes or if you screw up an update on a Corosync cluster, you have a good chance to finish with a split-brain situation. In that case DRBD automatically disconnect the resources and let you must fix the mess by hand.

Check nodes status

cat /proc/drbd
version: 8.4.0 (api:1/proto:86-100)
GIT-hash: 28753f559ab51b549d16bcf487fe625d5919c49c build by gardner@, 2011-12-1
2 23:52:00
 0: cs:StandAlone ro:Secondary/Unknown ds:UpToDate/DUnknown   r-----
    ns:0 nr:0 dw:0 dr:0 al:0 bm:0 lo:0 pe:0 ua:0 ap:0 ep:1 wo:b oos:76

The master isn’t happy and running.
The secondary node isn’t better either:

cat /proc/drbd
version: 8.4.0 (api:1/proto:86-100)
GIT-hash: 28753f559ab51b549d16bcf487fe625d5919c49c build by gardner@, 2011-12-1
2 23:52:00
 0: cs:StandAlone ro:Primary/Unknown ds:UpToDate/DUnknown   r-----
    ns:0 nr:0 dw:144 dr:4205 al:5 bm:0 lo:0 pe:0 ua:0 ap:0 ep:1 wo:b oos:100

Fixing the cluster

To repair the cluster we will declare one node “obsolete” (we choose the secondary here) and then reconnect resources so they can resume synchronization.

On the “obsolete” node:

drbdadm secondary all
drbdadm disconnect all
drbdadm -- --discard-my-data connect all

On the master node:

drbdadm primary all
drbdadm disconnect all
drbdadm connect all

[OpenVZ] Limit memory usage for file-caching

OpenVZ kernel handle memory exactly like vanilla one. By default it will use as many memory as possible to cache data and file. So if you look at memory usage with a simple free -m command inside a container, and pick the wrong line, you can conclude that you’re lacking RAM when you not.

If you want to have a better idea of memory usage you can check the content of the /proc/meminfo:

# cat /proc/meminfo | egrep 'MemTotal|MemFree|Slab|SReclaimable|Buffers'
MemTotal:       24485028 kB
MemFree:          949880 kB
Buffers:         7601704 kB
Slab:            4725268 kB
SReclaimable:    4658232 kB

Buffers, and SReclaimable are use respectively for I/O buffering and file content caching and can be reallocated to processes needing RAM on-demand. Therefore this memory is in fact ‘free’.

Now one interesting thing about OpenVZ is that you can limit this file caching behavior by container, using the dcachesize variable, like this:

# vzctl set  --dcachesize 268435456:295279001 --save

Here we limit the VM to use 256Mb for file caching. Note that you must use the ubc container’s memory management schema not the standard SLM:

# vzctl set  --save --slmmode ubc

Maximum HTTP header size

The HTTP specification (RFC2616 for HTTP/1.1) doesn’t define a maximum header size.
However, in practice, all servers have limits, for header numbers and header field size:

Apache 2.x: 8K
Nginx: 8K
IIS: 8K-16K (depending version)

If a request line exceed the limit a 414 Request-URI Too Large error is returned. If a request header field exceed the limit a 400 Bad Request error is returned. In order to be sure that a request will be proceed by all HTTP server, it’s better to limit the request size to not exceed 8190 Bytes (and yes that include cookie data).

If you can’t do that, the only remaining solution is to increase the limits values. For apache you can play with the LimitRequestFieldSize and LimitRequestLine parameters. For nginx take a look at the large_client_header_buffers parameter.

Keep in mind that increasing theses values to much will seriously degrade performance.

iptstate

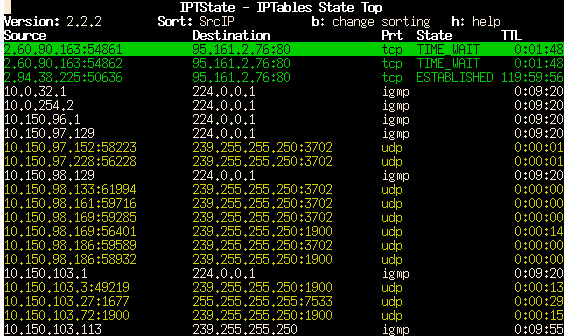
iptstate is a ncurse tool that displays information held in the netfilter conntrack table in a top-like format. Output can be sorted by any field, reversed, and has several formatting option:

Verify a SSL certificate installation with openssl

Usually people use their browser or a dedicated website like ssltest to test a server certificate installation.

But you can do it directly with the openssl command:

# openssl s_client -CApath /etc/ssl/certs/ -connect www.foobar.com:443
...
...
New, TLSv1/SSLv3, Cipher is AES256-SHA256
Server public key is 2048 bit
Secure Renegotiation IS supported
Compression: NONE
Expansion: NONE
SSL-Session:
    Protocol  : TLSv1.2
    Cipher    : AES256-SHA256
    Session-ID: 9E01CD86FA9F1483AD505F17E34C0B9BF99F57BBF9B5E6A5F2946F8858A86807
    Session-ID-ctx: 
    Master-Key: 8ED5443DCD5F6706A0DF5C0196E1B3AFBAAD3FB0B5B680EB212D4FC3F2BCC24209D0E241FBA746D85559CFA8539D99F4
    Key-Arg   : None
    PSK identity: None
    PSK identity hint: None
    SRP username: None
    Start Time: 1474905181
    Timeout   : 300 (sec)
    Verify return code: 0 (ok)
---

The line Verify return code: 0 indicate a correct installation. Note that the -CApath option tells openssl where to look for the CA certificates. On Debian the directory is /etc/ssl/certs/.

[OpenVZ] NFSd v3 inside a container

Hypervisor prerequisite

In order to get a working NFS server daemon inside a container, you must satisfy some prerequisites on the hypervisor. First the kernel version must be recent enough. Using the latest RHEL5 or RHEL6 OpenVZ kernels is recommended. Also you need vzctl in version 3.0.24 or superior. Next you must install and load the nfsd kernel module.

Only then you can enable the nfsd capability for the container, like this:

vzctl set $ID --feature nfsd:on --save

Don’t forget to restart the container to activate this capability. After that, to simplify the VM firewall configuration i recommend you to explicitly set the lockd binding ports:

hypervisor:~# vi /etc/modprobe.d/lockd.conf
options lockd nlm_udpport=2045 nlm_tcpport=2045

NFS VM configuration

First install the nfs-kernel-server and rpcbind packages. Specify the RPC ports to use and disable NFSv4 support:

nfsvm:~# vi /etc/default/nfs-kernel-server
# Options for rpc.mountd.
# If you have a port-based firewall, you might want to set up
# a fixed port here using the --port option. For more information,
# see rpc.mountd(8) or http://wiki.debian.org/SecuringNFS
# To disable NFSv4 on the server, specify '--N 4' here
RPCMOUNTDOPTS="--manage-gids -N 2 -N 4 --port 2048"
nfsvm:~# vi /etc/default/nfs-common
# Options for rpc.statd.
#   Should rpc.statd listen on a specific port? This is especially useful
#   when you have a port-based firewall. To use a fixed port, set this
#   this variable to a statd argument like: "--port 4000 --outgoing-port 4001".
#   For more information, see rpc.statd(8) or http://wiki.debian.org/SecuringNFS
STATDOPTS="--port 2046 --outgoing-port 2047"

Don’t forget to restart the daemon.
Lastly, modify the VM firewall configuration: open the ports 111 tcp/udp and the range 2045-2049 tcp/udp for all NFS-clients IP.

Further Reading and sources

[OpenBSD] DDoS survival guide

First keep calm and check your firewall/router state table:

fw1:~# pfctl -si | grep current
current entries                    421356 

Here we have a state table with much more entries than usual (400K instead of 100K). There is very probably an ongoing attack.

Which IP is targeted ?

For this task i use this script:

fw1:~# fw1:~# pfctl -ss | top_states.pl
62.210.216.82 (387654)
62.210.119.54 (1544)
62.210.216.10 (900)
62.210.216.13 (864)
...

The targeted IP will have an abnormally large number of entries. Here the winner is 62.210.216.82

On which port ?

fw1~# pfctl -ss | grep -- "-> 62.210.216.82" | awk '{print $5}' | sort -n | uniq -c
200307 62.210.216.82:80

Classic HTTP Flood attack.

At this point we have two possibilities:

  • limits the number of simultaneous connections to the targeted IP
  • block any access to the targeted IP

The first solution is appropriate in case of small scale attack. The latter is more extreme but has the advantage to not put at risk the rest of the network.

Limit the number of simultaneous connections

Add the following rule before the one authorizing the port 80:

pass in quick on $ext_if proto tcp to 62.210.216.82 port http keep state (max 10000)

Then kill all the supernumerary state entries:

fw1:~# pfctl -k 0.0.0.0/0 -k 62.210.216.82
fw1:~# pfctl -k 62.210.216.82

Block any access

Add the following rule:

block in quick on $ext_if to 62.210.216.82

Then kill all the supernumerary state entries:

fw1:~# pfctl -k 0.0.0.0/0 -k 62.210.216.82
fw1:~# pfctl -k 62.210.216.82

CLI file explorers

Ranger

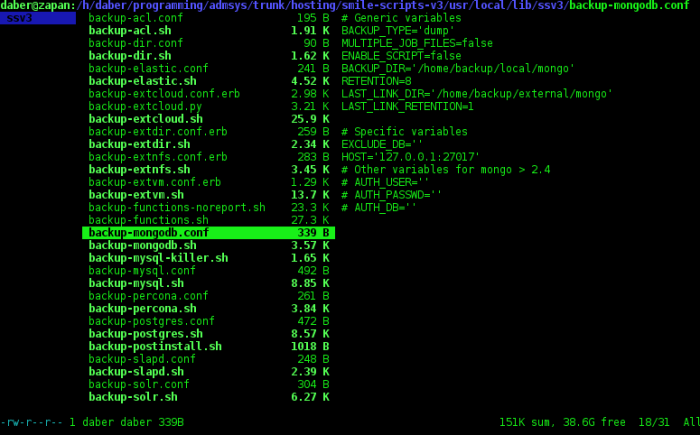
ranger is a console file manager with vi key bindings. It provides a minimalistic and nice curses interface with a view on the directory hierarchy (Miller column’s style).

Text files are displayed in a simple pager using less. Zipped files are automatically uncompressed and viewed in the same way. If you choose an image file, a preview will be displayed in colored ascii art.

Ranger uses many of the same keybindings as “vim”.
For instance, the movement commands mirror vim closely:

j = Move down
k = Move up
h = Move to parent directory
gg = Go to the top of the list
G = Go to the bottom of the list
-f = Page down
-b = Page up
J = Page down 1/2 page
K = Page up 1/2 page
H = Go back through navigation history
L = Go forward through navigation history

Last File Manager

If you prefer a more ‘traditional’ way of browsing, you can try lfm. It’s a powerful ncurse file manager written in Python. It support 1-pane or 2-pane views, tabs, files filters, bookmarks, history and VFS support for compressed files.

Midnight Commander

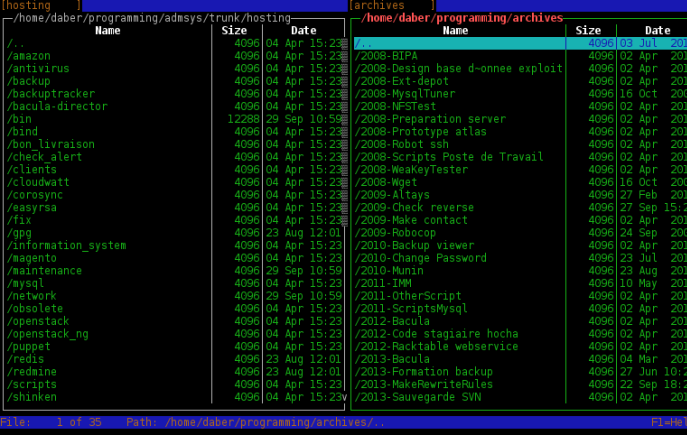
Midnight Commander is probably the most well-known application of this kind and probably the most easy to use due to being the closest to old and well know “Norton Commander”. In MC arrow keys control file selection, the insert key is used to select files and the Function Keys perform operations such as renaming, editing and copying files. It also supports mouse operations.

Zsync

zsync is a file transfer program that allows you to synchronize a local file with a remote server version. zsync is very efficient as it only downloads new parts of the file, using the same algorithm as rsync.

Server usage

Use zsyncmake to build a control file for zsync client, like this:

zsyncmake -z myiso.iso

Client usage

zsync http://foobar.com/daily-live/current/myiso.iso.zsync

Fix EHLO for multi-front platform

First verify that the VIP used for outgoing traffic has a correct reverse DNS record:

host 195.54.62.XX

Fix it if necessary. Next, change the /etc/mailname on every VM. Value should be strictly identical to the reverse.

Last step, indicate to every MTA’s VM to use a custom EHLO value instead of the hostname. For exim simple create a file /etc/exim4/exim4.conf.localmacros with the following content:

REMOTE_SMTP_HELO_DATA=<reverse_value>