[Magento] Session and zend_mm_heap corrupted

Since version 1.3 Magento can use multiple layer of cache, for example a memcached for content cache and session, and a database for the rest. This mechanism work pretty well except when you have a connectivity problem.

If Magento is unable to load a session, the request processing will end immediately preventing Apache from logging it. The only information inside the error log will be an zend_mm_heap corrupted entry.

To ‘fix’ this behavior, you must increase the default timeout for the PHP session handler for a value greater than the TCP re-transmission delay. A 5 seconds value is good enough.

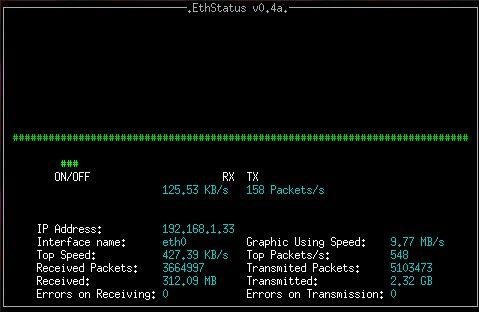
ethstatus

ethstatus is a simple ncurse program for displaying real time statistics of incoming and outgoing traffic. It is similar to iptraf but is meant to run as a permanent console task to monitor the network load.

ethstatus can take several options, like -i to specify the ethernet interface to monitor and -S to specify the maximum network speed in bits per second.

Mailx command examples

mailx is an evolution of the original mail command line utility for sending and receiving mail. It a very useful tool to test mail setup.

How the mail command works

The mail command invokes the “standard” sendmail command which in turns connects to the local MTA (mail transfert agent). In most modern distribution the sendmail binary isn’t used anymore, and it’s just a symbolic link to the MTA.

The local MTA (exim, postfix, etc..) run an SMTP server that accept connection on the port TCP 25.

Install the mail command

On Debian three packages provide the mailx command. I suggest you to install the heirloom-mailx package, because this version has more features and options.

Sending mails

You can use mailx interactively. You can hit enter for new lines, and when done typing the message press Ctrl+D and mailx would display an EOT:

$ mail -s "This is the subject" someone@foobar.com
I'm batman!
EOT

1. Body content from a file

The message body of the email can be taken from a file:

$ mail -s "This is Subject" someone@foobar.com < /path/to/file

The message can also be piped:

$ echo "This is message body" | mail -s "This is Subject" someone@foobar.com

2. Multiple recipients

To send the mail to multiple recipients, specify all the emails separated by a comma:

$ echo "This is message body" | mail -s "This is Subject" someone@foobar.com,someone2@foobar.com

3. CC and BCC

The -c and -b options can be used to add CC and BCC addresses respectively:

$ echo "This is message body" | mail -s "This is Subject" -c user@foobar.com someone@foobar.com

4. Specify From name and address

To specify a “FROM” name and address, use the -r option:

$ echo "This is message body" | mail -s "This is Subject" -r "ThePope<thepope@vactican.com>" someone@foobar.com

5. Specify “Reply-To” address

The reply to address is set with the internal option variable “replyto” using the -S option:

$ echo "This is message" | mail -s "Testing replyto" -S replyto="batman@foobar.com" someone@foobar.com

6. Attachments

Attachments can be added with the -a option:

$ echo "This is message body" | mail -s "This is Subject" -r "ThePope<thepope@vactican.com>" -a /path/to/file someone@foobar.com

nmap

nmap aka. network mapper is a very versatile network tool. It can be use to explore networks, perform quick ‘security’ audit and find open ports on remote machines.

Scan an IP

# nmap 192.168.0.4

Scan a range

# nmap 192.168.0.4-22

Scan a subnet

# nmap 192.168.0.0/24

Beside providing a netmask you can also use a wildcard character:

# nmap 192.168.0.*

Exclude an IP from a scan

Use the --exclude option. You can specify an IP or a range.

Scan a list of hosts from a file

Use the -iL option. nmap will use the file content as a list of host to scan.

Find out ‘live’ hosts in a network

Use the -sP option. Only the responsive hosts will be listed:

# nmap -sP 10.4.0.0/24

Guess the host OS

Use the -O --osscan-guess options. nmap will try to determine the OS of the scanned hosts using several tricks.

Perform a tcp null scan to “fool” a firewall

# nmap -sN 192.168.0.4

Configure SFTP access with ProFTPd

Since version 1.3.3rc1 ProFTPd have a mod_sftp module. This module implements the core functionalities of the SSH2 protocol and its SFTP subsystem.

Using ProFTPd implementation brings some practical advantages:

  • no need to spawn another OpenSSH daemon on a another port
  • no need to tweak sshd_config to allow chrooted SFTP
  • you can chroot a user into any directory even ones which doesn’t belong to root
  • you can use ‘virtual’ accounts instead of unix ones

Enable SFTP support

Add the following block to /etc/proftpd/proftpd.conf:

SFTPEngine on

Port 115
SFTPLog /var/log/proftpd/sftp.log
TransferLog /var/log/proftpd/sftp-xferlog

# Host Keys
SFTPHostKey /etc/ssh/ssh_host_rsa_key
SFTPHostKey /etc/ssh/ssh_host_dsa_key

# SFTP specific configuration
DefaultRoot ~

I arbitrary chose the port TCP 115 because that the port for SFTP after all (just not the same SFTP) 😉

Choose the authentication method

Like OpenSSH it can be done by password or by public key. For password add the following snippet to /etc/proftpd/proftpd.conf:

# Authentication method
SFTPAuthMethods password
AuthUserFile /etc/proftpd/sftp.passwd

If you prefer using keys:

# Authentication method
SFTPAuthMethods publickey
SFTPAuthorizedUserKeys file:/etc/proftpd/sftp.passwd.keys/%u

Create users accounts

We will use ProFTPd virtual account system. First we create the account file:

touch /etc/proftpd/sftp.passwd
chown proftpd /etc/proftpd/sftp.passwd
chmod go-rwx /etc/proftpd/sftp.passwd

File syntax is very simple:

username:PASSWORD_HASH:UID:GID:Comment for human:/home/user_home:/bin/bash

To generate the password you can use pwgen and hash it with md5 like this:

PASS=$(pwgen -Bs1 15); echo $PASS
mkpasswd --hash=md5 $PASS

UID and GID must be numerical values. You can use value from an actual unix account to map the virtual user to it.

Add user public keys

If you prefer using keys authentication, create a dedicated directory for storing keys:

mkdir /etc/proftpd/sftp.passwd.keys
chown proftpd /etc/proftpd/sftp.passwd.keys
chmod go-rwx /etc/proftpd/sftp.passwd.keys

Then create a file per SFTP user and fill it with the public keys you want. Don’t forget to convert them into RFC4716 format before:

ssh-keygen -e -f key_to_convert.pub > key_in_rfc4716.pub

After all theses modifications, restart ProFTPd and test. Adjust firewall rules accordingly.

Further Reading and sources

[MySQL] Replication over SSL

Prerequisites

  • Mysqld 5.1 or superior
  • Openssl 0.9.8e or superior
  • an already running mysql replication

Check SSL support

mysql> show variables like '%ssl%';
+---------------+----------+
| Variable_name | Value    |
+---------------+----------+
| have_openssl  | DISABLED |
| have_ssl      | DISABLED |
| ssl_ca        |          |
| ssl_capath    |          |
| ssl_cert      |          |
| ssl_cipher    |          |
| ssl_key       |          |
+---------------+----------+
7 rows in set (0.01 sec)

DISABLED means mysqld has ssl support but it’s just not enabled. If you have NO instead then you don’t have SSL support.

Generate certificates

Create a /etc/mysql/certs directory on both master and slave node.

Generate a key and a CA certificate:

openssl genrsa 2048 > ca-key.pem
openssl req -new -x509 -nodes -days 3600 -key ca-key.pem -out ca.pem

Generate a server key and certificate:

openssl req -newkey rsa:2048 -days 3600 -nodes -keyout server-key.pem -out server-req.pem
openssl rsa -in server-key.pem -out server-key.pem
openssl x509 -req -in server-req.pem -days 3600 -CA ca.pem -CAkey ca-key.pem -set_serial 01 -out server-cert.pem

And finally a client key and certificate:

openssl req -newkey rsa:2048 -days 3600 -nodes -keyout client-key.pem -out client-req.pem
openssl rsa -in client-key.pem -out client-key.pem
openssl x509 -req -in client-req.pem -days 3600 -CA ca.pem -CAkey ca-key.pem -set_serial 01 -out client-cert.pem

Copy ca-cert.pem, client-cert.pem and client-key.pem to the slave node.

Mysqld configuration

On the master node add into /etc/mysql/my.cnf into the [mysqld] section:

ssl-ca=/etc/mysql/certs/ca.pem
ssl-cert=/etc/mysql/certs/server-cert.pem
ssl-key=/etc/mysql/newcerts/server-key.pem

Restart mysqld.

On the slave node, add the following lines:

ssl-ca=/etc/mysql/certs/ca.pem
ssl-cert=/etc/mysql-ssl/client-cert.pem
ssl-key=/etc/mysql-ssl/client-key.pem

Restart mysqld.

Last step: tell to replication process to use exclusively a SSL connection:

GRANT USAGE ON *.* TO 'slave_user'@'%' REQUIRE SSL;
FLUSH PRIVILEGES;

Secret Order of the Ninja Code Monkeys

We are society’s most elite programmers, we are the guardian of 0 and 1, we protect your systems when you aren’t around, we are who you can turn to when you need help with your application. Our members are widely diversified and dispersed all over the world and our mission is to make this world a better place using out keen and sometimes supernatural coding styles along with our true spirits and extreme discipline. Together we are making a difference !

The Order of the Ninja Code Monkeys has been in existence for many years now and have thousands of members. Now we are taking our outreach even farther by opening the nether portal to enlightenment outside our practicing realm and into cyberspace.

The Secret Order of the Ninja Code Monkeys follow very specific rules :

  • We accomplish the mission, failure is not an option
  • We never write any SPECS
  • We NEVER comment our code (you figure it out)
  • We NEVER free (good) food
  • We NEVER give real estimates of how long it will take
  • We NEVER tell how we did it (you won’t understand)
  • We NEVER Bring Harm to a user- by choice
  • We live to be challenged
  • Working Applications must be modified
  • The newer the technology, the more dangerous we become
  • We strive for peace, harmony, and enlightment in all things
  • Always being Honor to yourself

Now get your t-shirt and join us or ask a ninja what it’s to be a ninja.

nslookup

nslookup is a network administration tool for querying DNS servers. nslookup is very useful tool for debugging DNS record.

Query a domain name

Using the current ‘default’ DNS server:

# nslookup debian.org 
Server:         62.210.16.6
Address:        62.210.16.6#53

Non-authoritative answer:
Name:   debian.org
Address: 5.153.231.4

Using a specific DNS server:

# nslookup debian.org 8.8.8.8
Server:         8.8.8.8
Address:        8.8.8.8#53

Non-authoritative answer:
Name:   debian.org
Address: 5.153.231.4

Query the MX Record

# nslookup -query=mx debian.org 
Server:         62.210.16.6
Address:        62.210.16.6#53

Non-authoritative answer:
debian.org      mail exchanger = 0 muffat.debian.org.
debian.org      mail exchanger = 0 mailly.debian.org.

Here we have two MX (mail exchange) server for the zone debian.org

Query the NS Record

# nslookup -query=ns  debian.org 
Server:         62.210.16.6
Address:        62.210.16.6#53

Non-authoritative answer:
debian.org      nameserver = dns1.easydns.com.
debian.org      nameserver = debian1.dnsnode.net.
debian.org      nameserver = dns4.easydns.info.
debian.org      nameserver = sec1.rcode0.net.
debian.org      nameserver = sec2.rcode0.net.

The NS record give the domain’s authoritative DNS servers list.

Query the SOA Record

# nslookup -query=soa  debian.org 
Server:         62.210.16.6
Address:        62.210.16.6#53

Non-authoritative answer:
debian.org
        origin = denis.debian.org
        mail addr = hostmaster.debian.org
        serial = 2016092612
        refresh = 1800
        retry = 600
        expire = 1814400
        minimum = 600

The SOA record (start of authority) give information about the domain, it TTL, the e-mail address of the domain administrator, the domain serial number, etc…

Further Reading and sources

Useful commands to check hard disk partitions

fdisk

fdisk is a general partitioning tool, and was the de-facto standard at the time all hard drive were under 2TB. It’s still a useful tool today. You can use it to display partitions information like this:

$ sudo fdisk -l

Disk /dev/sda: 298.1 GiB, 320072933376 bytes, 625142448 sectors
Units: sectors of 1 * 512 = 512 bytes
Sector size (logical/physical): 512 bytes / 512 bytes
I/O size (minimum/optimal): 512 bytes / 512 bytes
Disklabel type: dos
Disk identifier: 0x000ae2b8

Device     Boot    Start       End   Sectors   Size Id Type
/dev/sda1  *        2048  60000255  59998208  28.6G 83 Linux
/dev/sda3       60000256 625141759 565141504 269.5G  5 Extended
/dev/sda5       60002304  75001855  14999552   7.2G 82 Linux swap / Solaris
/dev/sda6       75003904 625141759 550137856 262.3G 83 Linux

As you can see each partition is reported separately with details about size, start and end sectors id, type, etc…

parted

With disk > 2TB a new type type of partitioning table was needed to replace the old MBR. That the GPT (GUID Partitioning Table). New partitioning tool were needed too, hence the creation of parted. Like fdisk you can use parted to display partitions information:

$ sudo parted -l

Model: ATA Hitachi HTS72323 (scsi)
Disk /dev/sda: 320GB
Sector size (logical/physical): 512B/512B
Partition Table: msdos
Disk Flags: 

Number  Start   End     Size    Type      File system     Flags
 1      1049kB  30.7GB  30.7GB  primary   ext4            boot
 3      30.7GB  320GB   289GB   extended
 5      30.7GB  38.4GB  7680MB  logical   linux-swap(v1)
 6      38.4GB  320GB   282GB   logical   ext4

df

df displays the amount of disk space available on all currently mounted file systems.

$ df -h
Filesystem            Size  Used Avail Use% Mounted on
/dev/sda1              29G  5.3G   22G  20% /
udev                   10M     0   10M   0% /dev
tmpfs                 1.2G   31M  1.2G   3% /run
tmpfs                 2.9G   54M  2.9G   2% /dev/shm
tmpfs                 5.0M  4.0K  5.0M   1% /run/lock
tmpfs                 2.9G     0  2.9G   0% /sys/fs/cgroup
/dev/sda6             259G  207G   39G  85% /home
tmpfs                 587M   16K  587M   1% /run/user/10991
/home/daber/.Private  259G  207G   39G  85% /home/daber

Note that df can take additional arguments to customize it output:

$ df -h --output=source,fstype,size,used,avail,pcent,target -x tmpfs -x devtmpfs
Filesystem           Type      Size  Used Avail Use% Mounted on
/dev/sda1            ext4       29G  5.3G   22G  20% /
/dev/sda6            ext4      259G  207G   39G  85% /home
/home/daber/.Private ecryptfs  259G  207G   39G  85% /home/daber

di

di is kind of like a more advanced version of df:

$ di
Filesystem         Mount               Size     Used    Avail %Used  fs Type 
/dev/sda1          /                  28.0G     5.2G    21.4G   24%  ext4    
tmpfs              /dev/shm            2.9G     0.1G     2.8G    2%  tmpfs   
tmpfs              /etc/machine-id     1.1G     0.0G     1.1G    3%  tmpfs   
/dev/sda6          /home             258.1G   206.1G    38.8G   85%  ext4    
/home/daber/.Priva /home/daber       258.1G   206.1G    38.8G   85%  ecryptfs
tmpfs              /run                1.1G     0.0G     1.1G    3%  tmpfs   
tmpfs              /run/lock           5.0M     0.0M     5.0M    0%  tmpfs   
tmpfs              /run/user/10991   586.3M     0.0M   586.3M    0%  tmpfs   
tmpfs              /sys/fs/cgroup      2.9G     0.0G     2.9G    0%  tmpfs   

di has many formatting options, which is very interesting for scripting.

lsblk

lsblk lists information about all available block devices. It doesn’t report the used/free disk space on partitions, but indicate their type and mountpoint:

$ sudo lsblk

NAME   MAJ:MIN RM   SIZE RO TYPE MOUNTPOINT
sda      8:0    0 298.1G  0 disk 
├─sda1   8:1    0  28.6G  0 part /
├─sda3   8:3    0     1K  0 part 
├─sda5   8:5    0   7.2G  0 part [SWAP]
└─sda6   8:6    0 262.3G  0 part /home
sr0     11:0    1  1024M  0 rom  

blkid

blkid prints the block device attributes. I usually use it for finding uuid for a given partition:

$ sudo blkid
/dev/sda5: UUID="38103cc4-6954-452a-a85d-841a0c9cb427" TYPE="swap" PARTUUID="000ae2b8-05"
/dev/sda1: UUID="f03c5ff1-e48f-4132-a955-de504284550f" TYPE="ext4" PARTUUID="000ae2b8-01"
/dev/sda6: UUID="de9f9a5d-8217-4378-8e51-90e2af77e3bc" TYPE="ext4" PARTUUID="000ae2b8-06"