Bad magic number in super-block

Sometime things goes wrong and filesystem finish in a corrupted state.
That were tools like fsck come to the rescue:

fsck /dev/sda5
fsck 1.41.4 (27-Jan-2009)
e2fsck 1.41.4 (27-Jan-2009)
fsck.ext4: Group descriptors look bad... trying backup blocks...
fsck.ext4: Bad magic number in super-block while trying to open /dev/sda5
 
The superblock could not be read or does not describe a correct ext4
filesystem.  If the device is valid and it really contains an ext4
filesystem (and not swap or ufs or something else), then the superblock
is corrupt, and you might try running e2fsck with an alternate superblock:
e2fsck -b 8193 <device>

Oups. The error “Bad magic number in super-block” clearly indicate that the superblock of the partition /dev/sda5 is in bad shape. But you can use superblock backup to restore the filesystem in a functional state.

First lets find where your superblock backups are kept:

mke2fs -n /dev/xxx
...
Superblock backups stored on blocks:
32768, 98304, 163840, 229376, 294912, 819200, 884736, 1605632, 2654208

Then restore the superblock from one of its backup:

e2fsck -b 2654208 /dev/sda5
Pound

pound is a tiny reverse proxy load balancer and SSL offloader. It’s not a caching proxy like Varnish, but its simplicity and lightweight make it a good choice for making an HTTPS front-end on a moderate traffic platform.

Create a PEM file

pound use the PEM format. A single PEM file can contain all the needed files (public certificate, intermediate certificate, root certificate and private key).

To convert your SSL files certificate to a PEM file usable for Pound:

# cat server.key > cert.pem
# cat your.domain.tld.crt >> cert.pem
# cat intermediate.crt >> server.pem

Disable SSLv3

To improve security you can disable the SSLv3 protocol. You need at least the patched version 2.6 to do that. Add the DisableSSLv3 directive inside your ListenHTTPs block.

Improve ciphers selection

To improve security you can also disable old/weak ciphers. Redefine the ciphers selection like this:

Ciphers    "EECDH+ECDSA+AESGCM:EECDH+aRSA+AESGCM:EECDH+ECDSA+SHA384:EECDH+ECDSA+SHA256:EECDH+aRSA+SHA384:EECDH+aRSA+SHA256:EECDH:EDH+aRSA:-RC4:EECDH+aRSA+RC4:EECDH+RC4:EDH+aRSA+RC4:!aNULL:!eNULL:!LOW:!3DES:!MD5:!EXP:!PSK:!SRP:!DSS:RC4+SHA"

Further Reading and sources

[Redhat] chkconfig

The chkconfig utility is a command-line tool for Redhat/Redhat-based distribution that allows you to specify in which runlevel to start a selected service, as well as to list all available services along with their current setting.

List all services

To display a list of services from the /etc/rc.d/init.d/ directory and services controlled by xinetd type either chkconfig --list or chkconfig with no additional arguments.

Enabling or disabling a given service

# chkconfig <service_name> <on|off>

For example, to enable postfix :

# chkconfig postfix on

By default chkconfig use headers from the init script to determine for which runlevel the script should be enabled/disabled.

You can override this behavior with the --level options. For instance, to enable the abrtd service in runlevels 3 and 5:

# chkconfig abrtd on --level 35

Do not use the --level option for service managed by xinetd.

Add a ‘custom’ service

You must add a custom line for chkconfig into your init script. For example:

# chkconfig: 2345 90 60

The first argument list runlevel to start the service for. The second argument is the startup priority and the third the stop priority.

After that, add the init script :

chkconfig --add <my_script>
chkconfig <my_script> on

xdiskusage

xdiskusage is a graphical tool for displaying disk usage per directory. It’s kind of an ancestor to the more desktop oriented tool baobab and filelight.

One terrific feature for sysadmin of xdiskusage is that it can use a du output file as data source !

First generate an output file on the host to analyse (here foobar-host1) :

# du -ab * > du_foobar-host1.txt

rsync the du output file on your desktop machine, then make a:

# xdiskusage du_foobar-host1.txt

A little fun with inodes

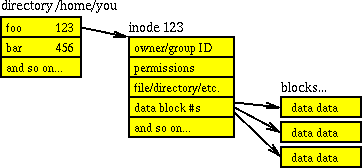
One amusing fact about filesystem is that the logical structure we see is very different from the “real” on-disk structure. For example we are used to thinking about directories as files “containers”, but in reality directories are just a type of file themselves and don’t store any files data.

On a modern filesystem (which means pretty much every filesystem nowadays with the exception of the old-but-still-in-use FAT32) files are split into two different parts: data blocks and inodes. Data blocks contain chuck of the file “contents”. Depending of the file size one or a huge number of data block are used. Inodes contains information about the file itself like its attributes (permission, owner id, group id, size, number of hard links, etc… depending the filesystem features) and the data blocks location. Directories are a ‘special’ type of file, containing a lists of association structures (aka. files) each of which contains one filename and one inode number.

Basically that look like this:

Now one important information to know is that most filesystems doesn’t allocate physical space to create inodes on the fly, but rather use space reserved for this task. So there is a maximum number of inodes for a given partition. When all inodes are ‘consumed’ no new file can be created.

Checking inodes usage

Therefore when troubleshooting you should not only check the remaining disk space, but also the remaining number of inodes:

# df -ih

And if you want to find which directories in the current path ‘use’ the most inodes:

# find . -xdev -type f | cut -d "/" -f 2 | sort | uniq -c | sort -n

Other commands with inodes options

ls can display inodes number with the -i option.
rm can delete a file indicated by its inode number with the same -i option. This combo really help when dealing with file with ‘strange’ or corrupted filename.

find has a -inum option. For example for finding file(s) knowing only its inode number:

find . -inum 435304 -print

For deleting this or theses files (remember hardlink have the same inode number):

find . -inum 435304 -delete

The tree command also has a cool --inodes option.

A little fun with dd

dd can be use in a lot of creative ways, but before playing with it remember to:

  • always triple check if= and of= values
  • never ever write on a mounted filesystem

Here some examples of fun things you can do with dd:

Backup an entire partition

# dd if=/dev/sda1 of=~/disk.img

For a compressed version:

# dd if=/dev/sda1 | gzip > ~/disk.img.gz

On a remote machine:

# dd if=/dev/sda1 | ssh foobar@192.168.0.2 "sudo dd of=/home/foobar/disk.img"

Restore an image partition

# dd if=disk.img of=/dev/sda1

For a compressed version:

# dd if=disk.img.gz | gunzip | dd of=/dev/sda1

Rip a CDROM

# dd if=/dev/cdrom of=disk.iso bs=2048

Clone hard disks

# dd if=/dev/sda of=/dev/sdb bs=4096 iflag=noerror oflag=sync

Erase MBR content

# dd if=/dev/zero of=/dev/sda bs=512 count=1

Further Reading and sources

[BIND] Add a new zone

What is a DNS zone ?

A zone is a subset, often a single domain, of the hierarchical DNS. Zone are generally defined inside a single ‘zone’ file, that describe its properties (refresh time, domain expiry, default TTL value, etc…) and all its resource records.

Create a new zone file

Let create a new zone file for brand new domain foobar.com. Following the BIND naming convention the zone file will be /etc/bind/db.foobar.com.conf, and look pretty much like this:

; Zone file for foobar.com
$TTL    3600
$ORIGIN foobar.com
@       IN      SOA     ns1.mydns.com.    root.foobar.com. (
                     2012033101         ; Serial
                           3600         ; Refresh
                           1800         ; Retry
                         604800         ; Expire
                          43200 )       ; Negative Cache TTL

        IN      NS      ns1.mydns.com.
        IN      NS      ns2.mydns.com.

@       IN      A       192.168.0.2
www     IN      A       192.168.0.2

The NS records indicate that we use two DNS servers for this new zone : ns1.mydns.com and ns2.mydns.com. The SOA record specify that ns1.mydns.com is the start of authority, and give the domain properties. Then we have a couple of classic A records, for the domain and a subdomain. Note here the usage of the @ symbol which is a shorthand for the $ORIGIN value.

Add the new zone

Now that we have a new zone file, we must modify BIND main setting file, usually /etc/bind/named.conf.local

For the master of the new zone, ns1.mydns.com here, we add the following block:

zone "foobar.com" {
        type master;
        file "/etc/bind/db.foobar.com.conf";
};

For slaves, like ns2.mydns.com, the syntax is a little different:

zone "foobar.com" {
        type slave;
        file "/etc/bind/db.foobar.com.conf";
        masters { ; };
};

Reload BIND configuration

# rndc reload

Shred

Wipe entire hard drives

The primary usage of the shred command is to wipe entire partition by overwriting the content. For example, to wipe /dev/sda5:

shred -vfz -n 10 /dev/sda5

-v: show progress
-f: change permissions to allow writing if necessary
-z: add a final overwrite with zeros to hide shredding
-n: overwrite N times instead of the default three time

Here we will overwrite /dev/sda5 ten times, enough to ensure that data can’t be retrieve without very special and complicated method.

Shred individual files

shred can also be use to overwrite and delete a given file, but it maybe not so efficient in that case. The man page warm you about:

CAUTION: Note that shred relies on a very important assumption: that the file system overwrites data in place. This is the traditional way to do things, but many modern file system designs do not satisfy this assumption.

It’s hard to evaluate if recovery of a “shredded” file could be possible, as it depend on the filesystem (and the mount options for ext3/4) and how data is ordered on the device. But keep this limitations in mind. For the command simply do:

shred -u foobar.txt

By default shred overwrites the file 25 times. You can customize this value using the --iterations=n parameter.